It's at this point of getting ready to seriously build volume that I take a moment to analyze which direction to go. It's too overwhelming for me to just throw paint on the canvas - at least for this kind of piece. I need a plan.
To start, I would take the reference photo of Wickers and bring it into a photo editing program. I use Photoshop. Along the top menu bar is a category named "Filters." Select this, and from the drop down menu choose Gaussian Blur. Up will come a window containing the image, and a handy sliding bar that can be adjusted from barely blurry to very very.
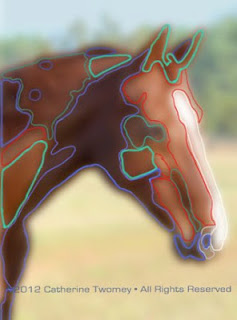
Above is an example of how to mass values to help plan and start a painting. This method may work for you - or not. I'll share several. I'm showing what's really helped me over the last lots of decades! Take a look, for example, at the areas outlined in the light green on the softened image. There are four of them.
The values within these areas combined are all closely related. Their hue, depth, amount of dark and light are very similar.
To make use of this knowledge, I would mix a large amount of this particular color and put it down on the canvas in these areas. Then I would continue on with the next group of related masses. This technique can also be accomplished using a program like Photoshop, using levels or Artistic Filters.
I will eventually go back into the large masses and add subtle nuances of value shifts and details, and soften the cookie-cutter effect left by the application of massed values.
Eventually, the more you practice and understand values, the easier and more automatic it becomes.
Extra help here; a link to Adobe products. And no, I don't work for them let alone get any kickbacks for linking:
http://www.adobe.com/products/photoshopfamily.html?promoid=JOLIW
