What's Below the Surface?

Three important areas for the artist to understand horse's anatomy
- There are three areas needing refinement. The artist will see how their location, size and shape affect the horse's surface anatomy (also see photo below).

- The top illustration is the original, and was introduced here. Circles on the above left illustration show the most important areas needing clarification.

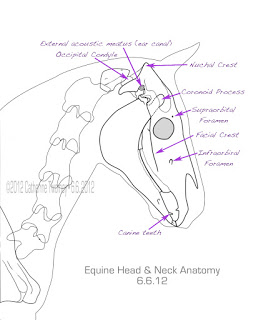
- The top red circle (left), the temporomandibular (TMJ) joint,is the hinge between the horse's jaw and skull. On the right illustration, you can now see where the Coronoid Process of the mandible (lower jaw) passes behind the zygomatic arch, thus completing the joint. Take a look at these two images to see how this joint works.

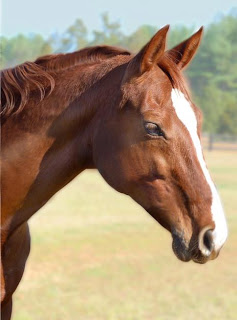
- The lowest circle, where the upper and lower teeth meet, illustrates the meeting of the upper and lower teeth where the upper and lower teeth have been defined. Compare the hardness/boniness  of the area around the mouth to the softer skin of the nose and lower face. 

- In the medical illustration on the right above I've labelled other landmark features that can influence the artist's work. We'll get into their importance later; but here you can see important arteries, veins and nerves travelling through these "holes" (foramen) in the skull that can appear on the surface of a painting.

- Some common anatomy terms to help the artist recognize what their function is: 

Painting What You See and Know

Medical illustration showing the correct positioning of the head and neck in the horse.
- At this point I want to examine the horse's head and neck anatomy. When I'm painting something I want to be accurate and realistic, it always helps to understand what I'm painting beneath the surface as well as on top.
- I've gotten some real bones (C1 - C3; "C" is cervical) from a great horse buddy to add to the horse skull I already have. 
- I want to know what the shapes are that I'm starting to paint on Wicker's portrait and make sure they're in the right size and place.  
- Compare the oil painting stage of the Wicker's portrait below to the bony landmarks labelled on the left. Although the view is lateral, whereas Wicker's head is slightly turned, I can still see bony landmarks that are important to show and paint correctly.
- To make certain I'm doing this kind of research accurately,I've referred to many equine anatomy books as well as real bones to do the medical illustration above. What's difficult about it is that the reference books are all over the map! I realize all horses are different, so I'm trying to find an acceptable standard.
- Note the location of the poll (occipital crest and C1; anatomically the occipital crest itself is the "poll") labeled above the C1/ atlas. Wickers the Warmblood is an upper level dressage horse, and I can see that she has been ridden correctly because her poll area is well developed and muscular. 
- Incorrect riding ("rollkur") can be seen in the poll of the horse at this link; note that the neck "breaks" further down the neck than it should. This kind of riding can lead to many problems in a horse's anatomy and physiology.